Slow Down and Take a Seat
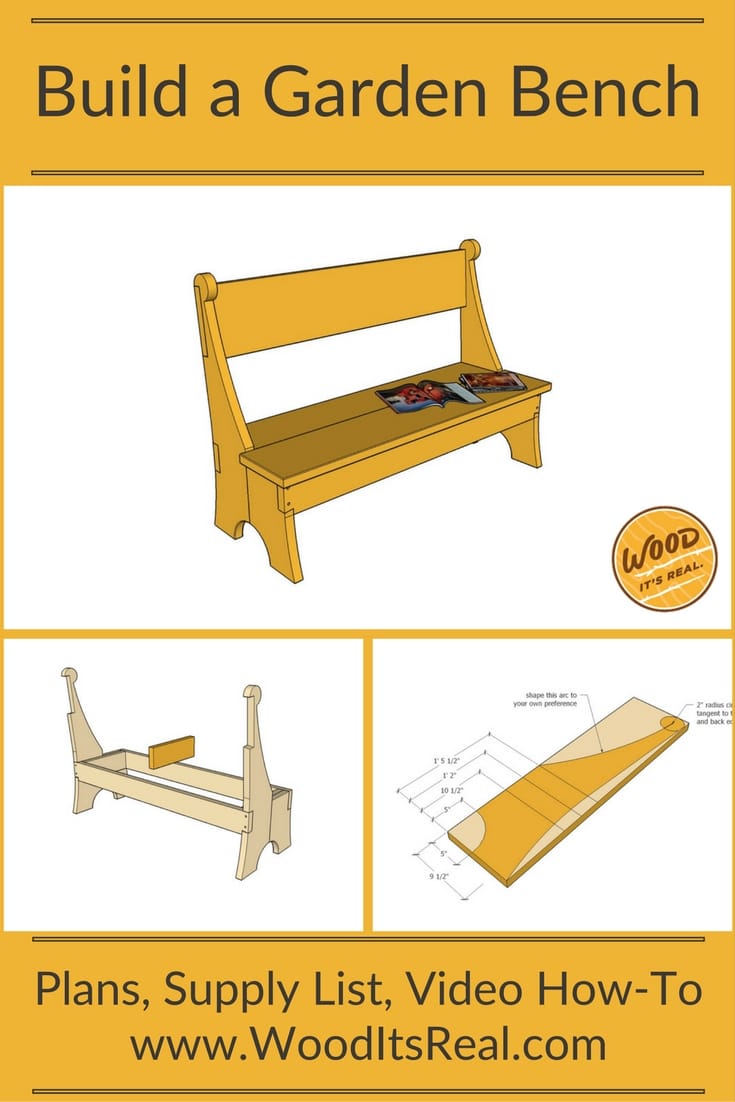 In hectic times – even in relaxed times – it’s nice to have a place to sit and just be. Here are plans for a comfortable and sturdy garden bench originally from Southern Living.
It’s made from pressure-treated Southern Yellow Pine so it’ll be able to withstand just about anything mother-nature can throw at it. It has some pretty cool detail work too. Dovetail joints and wooden dowel fasteners gives it a real handcrafted look. Elegant curves play nicely against the long straight back in the seat and most important it’s comfortable.
One of the things we really like about this project is the fact that you can do it over a weekend, with just a couple of tricks we can make even the curves in this bench simple to do.
Once you’ve made this project, let us know how it went. We’d love to see it and brag on you, OK?
Check out the step-by-step instructions below, or you can print out a cut list and overview of the build here: wooditsreal.wpengine.com-Build It Handcrafted Garden Bench
It’s Garden Bench Building Time
As you get started, here’s a handy video that takes you through all the steps to make your Southern Yellow Pine Garden Bench.
We recommend getting the following supplies:
MATERIALS
Lumber
• (4) 2″ x 12″ x 8′ Pressure Treated Southern Yellow Pine
• (3) 2″ x 6″x 8′ Pressure Treated Southern Yellow Pine
Other
• Exterior Grade Wood Glue
• 2″ Wood Deck Screws (20+)
• Appropriate Bit for Deck Screws
• 3/8″ Drill Bit
• Wooden Dowels
• Roundover Drill Bit
• Finishing nails (just a few)
• Thin (1/8″), long board or a thin, long piece of sturdy cardboard.
TOOLS
• Pencil, Measuring Tape
• 2-4 Bar Clamps (at least 5″ long)
• Handheld Saw
• Straight Edge / Carpenter Square
• Table Saw
• Jig Saw
• Electric Drill
• Radial Sander / Sanding Block
• (Optional)Spindle Sander or Drum Sander
• Protractor or Ruler
• Safety Glasses / Ear Protection
• Dust Mask / Work Gloves
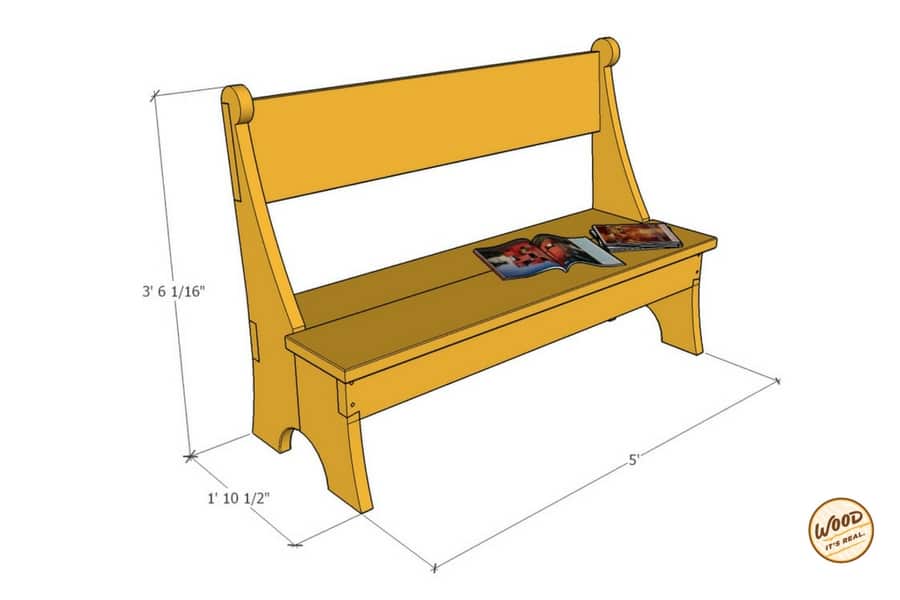
OVERALL DIMENSIONS OF THE GARDEN BENCH
CUT LIST
Follow these cuts for your DIY garden bench:


And now, for the fun part: putting your garden bench together.
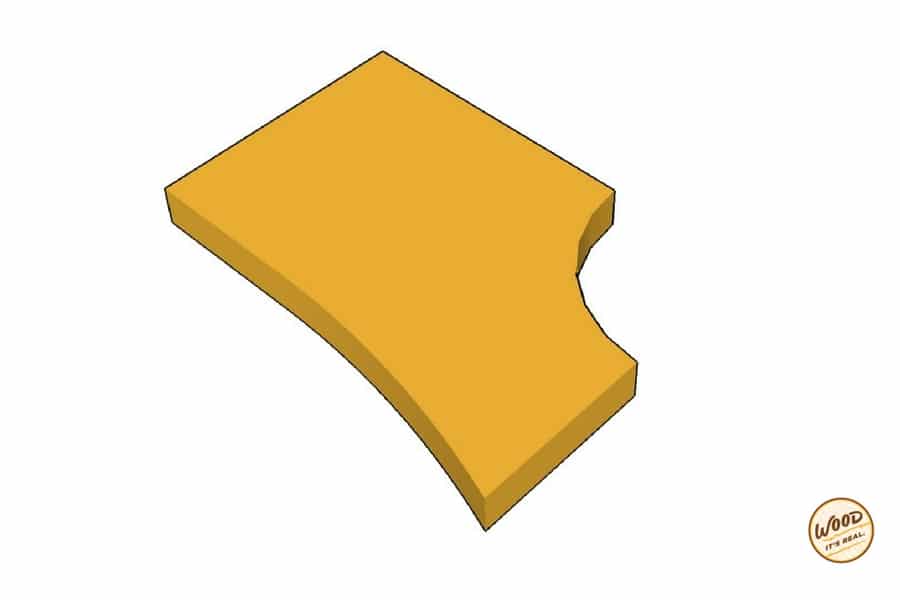
Step 1: Draw Out and Cut the Bench End Backs

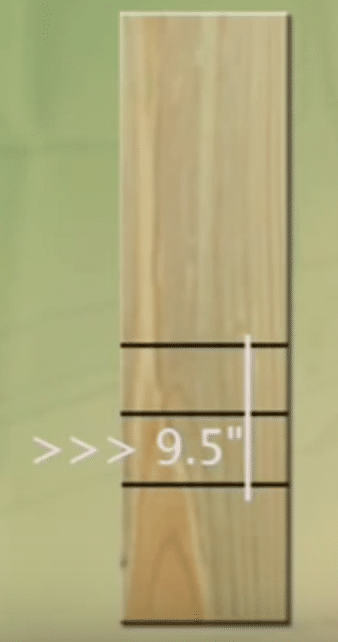
- To sketch out the longer of our two end boards, start at the bottom, measure up 10.5″, 14″ and 17.5″.Draw lines across the board at those points.
- Then measuring back from the front of the board, make the mark at nine and a half inches and then connect all these lines.

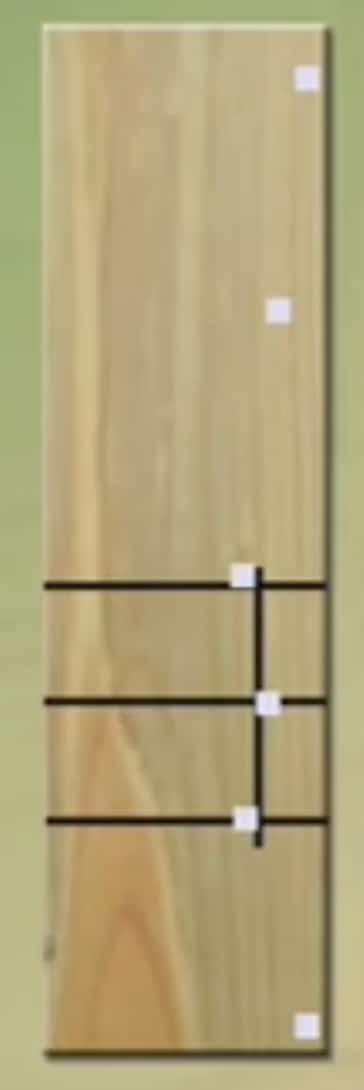
- Our next step is to set a series of finish nails in the board. This will mark the right location of the curve along the back. Set three nails at the 9.5″ mark on the three horizontal lines. Set two nails in the corner at both ends. Set one nail in the long part of what will become the curve at the back of the bench. See here:
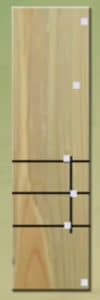
- Feed a very thin, long scrap board (1/8″ or so thick) or a long sturdy piece of cardboard through the nails. Draw a line along the edge to mark where you will cut.
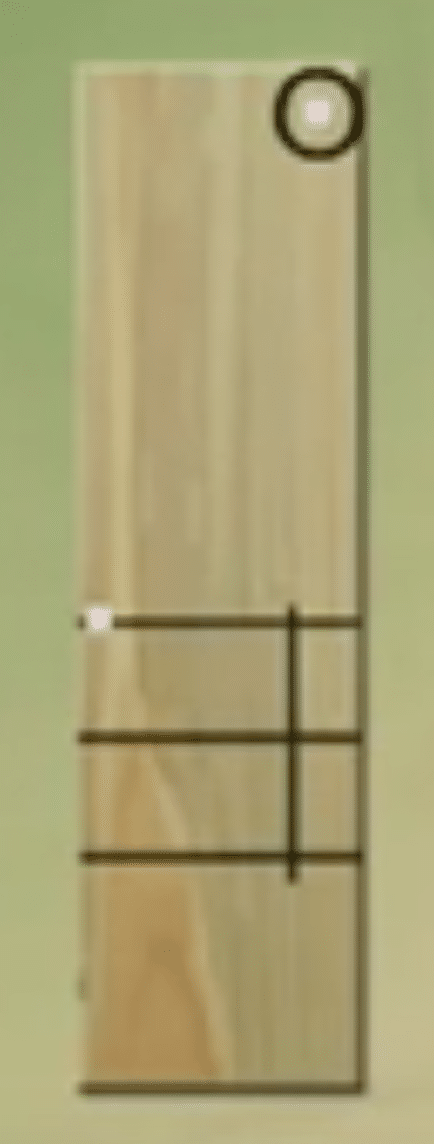
- Now, it’s time to create the circular detail at the top of the bench back. Mark a spot 2″ down and 2″ in from the top right corner of the board.
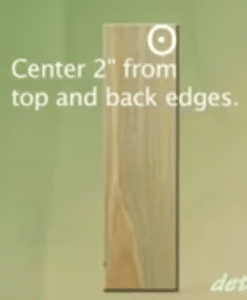
- Using a protractor or a ruler with holes drilled into it (like the video), draw out the circle at the top.
- Next, is to draw an arch to the bottom front edge of the piece. Using a protractor (or that trusty ruler), draw a 5″ arch.
- The last curve is along the front edge of the piece. Using finishing nails, place one nail on the edge of the top horizontal line (the one at 17.5″). Put another in the center of that circular detail at the top of the board.
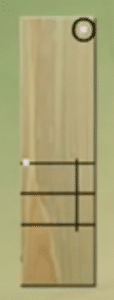 User the bender board or heavy duty cardboard piece to draw the front curve. Make it as curvy or straight as you want.
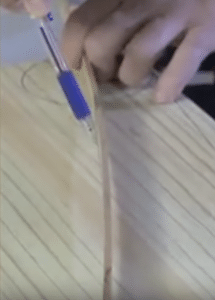
- Once the pattern is completely drawn, secure the piece in a vice and use a jigsaw to cut it out.

- Repeat this process to create the second bench back, or use this piece as a pattern to draw out the second piece.


Step 2: Draw Out and Cut the Bench End Front

- Shorter boards, two 15.5″ long piece, will be the front pieces of the bench legs. Use the piece from the 5″ arch as a pattern for the inside arch of the legs.
- Measure 9.5″ in from the right edge and mark or place a finishing nail.
- Use your thin board or sturdy cardboard piece to draw the front curve.
- Once the pattern is completely drawn, secure the piece in a vice and use a jigsaw to cut it out.
- Now would be a good time to sand any rough edges. You can use some elbow grease and a handheld sander, or if you have a spindle sander or drum sander in a drill, that works well too.
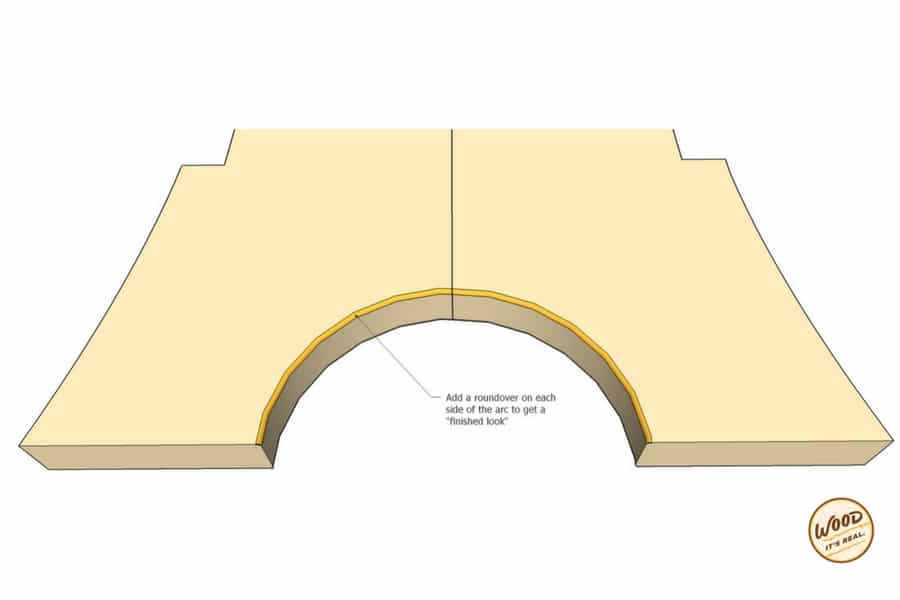
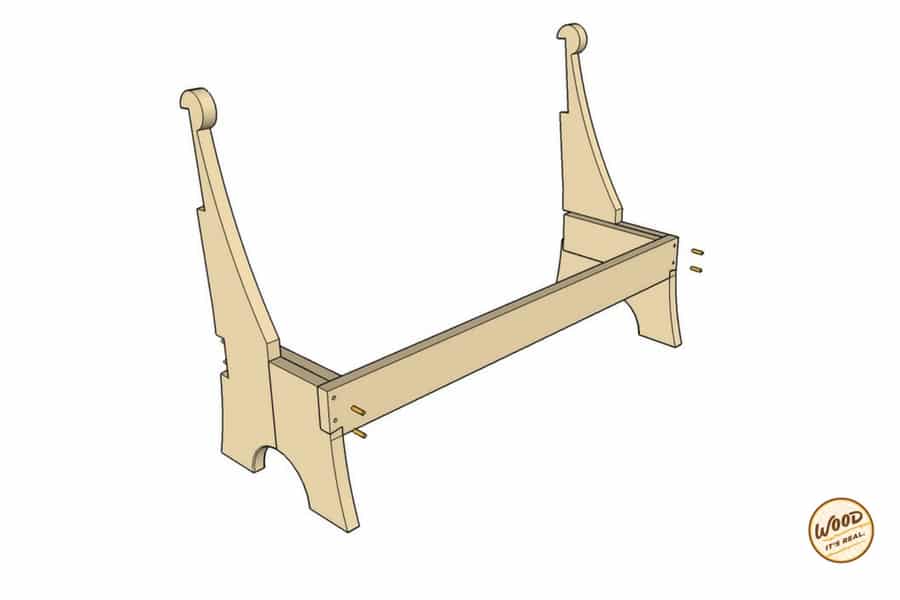
Step 3: Build the Bench Ends

- To join our two pieces together, we’re going to need to use a two-by-six cleat.
- Put the front and back pieces together, use a scrap piece of wood from a 2×6 to measure in approximately 1.5″ and make a mark. The distance between those two marks is going to be the length of these cleats.
- Put the board in place, align it with the top of the shorter piece and in-between those two marks.
- Drill some pilot holes and screw the boards together with the cleat.
- To give the bench a more finished look, use a round-over bit to soften the semi-circle formed at the bottom.
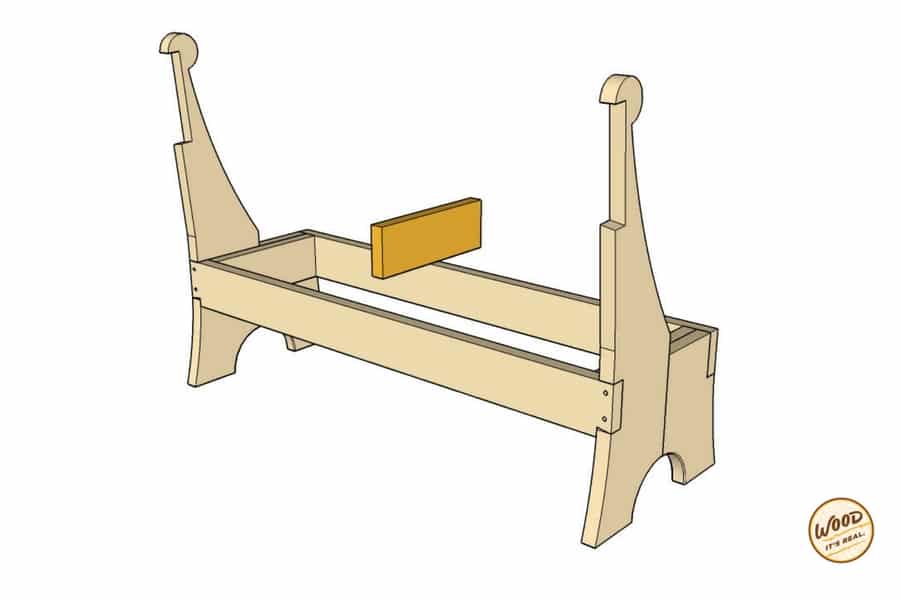
Step 4: Cut and Attach Front Apron
- Cut one 2×6 to a length of 60 inches long.
- We’ll make the dovetail pins on each end of the two-by-six aprons by measuring back from the edge an inch-and-a-half, the width of each side.
- Next, mark them and draw a line one inch long at that point.
- At the edge of the 2×6, measure up three-quarters of an inch, and connect that point with the one you just drew.
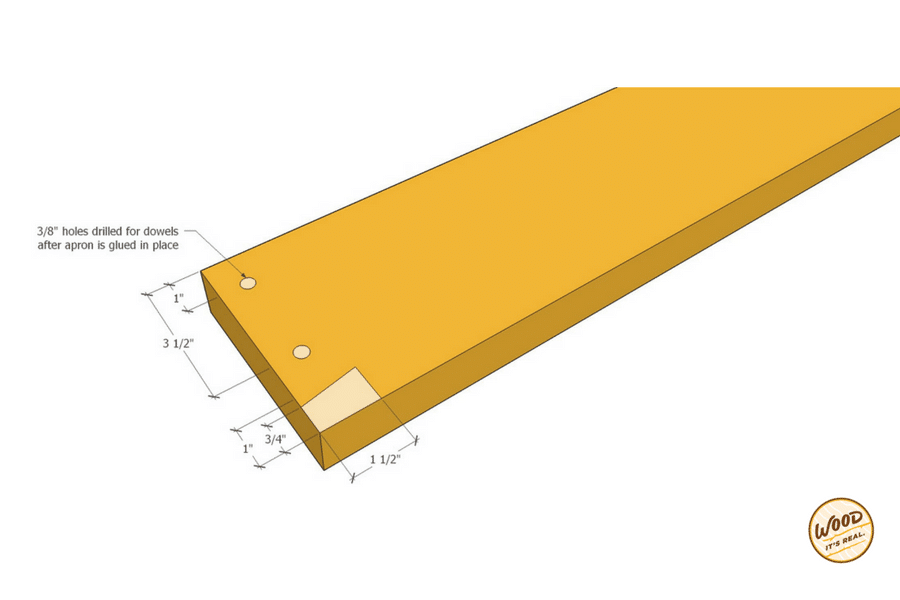
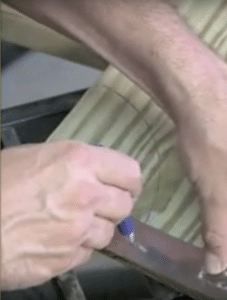
- Use an oscillating saw to cut the dovetails. The blade basically vibrates back and forth to make the cut and saves a lot of time.
- Once the pins are cut, trace the outlines on the front and rear edges of each side and make the cuts as deep as the apron is thick.
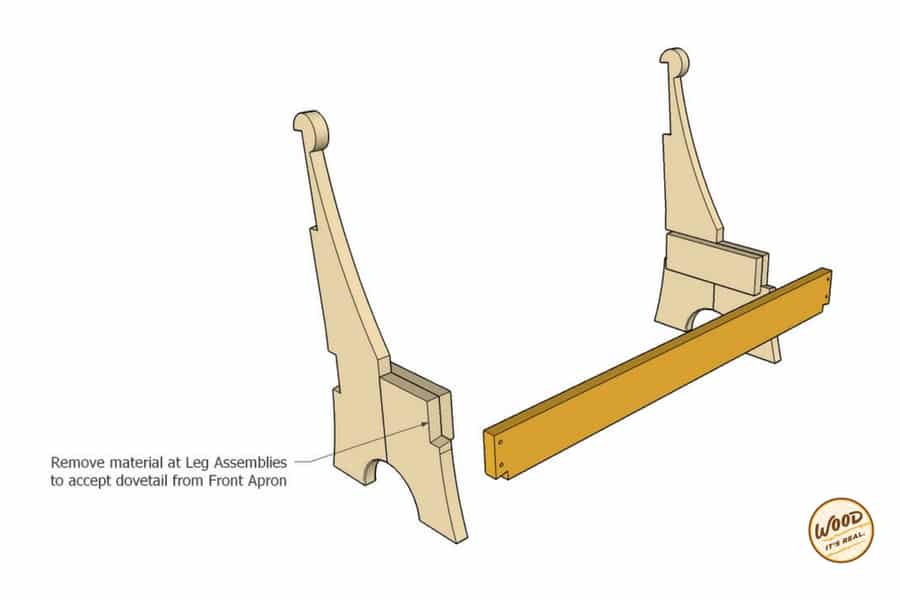
- Glue and clamp the apron in place.
- Once dry, drill 3/8″ holes through each joint and into the sides.
- Then drive wooden dowels to secure the joints. Cut off any excess with a saw.
Step 5: Cut and Attach Back Apron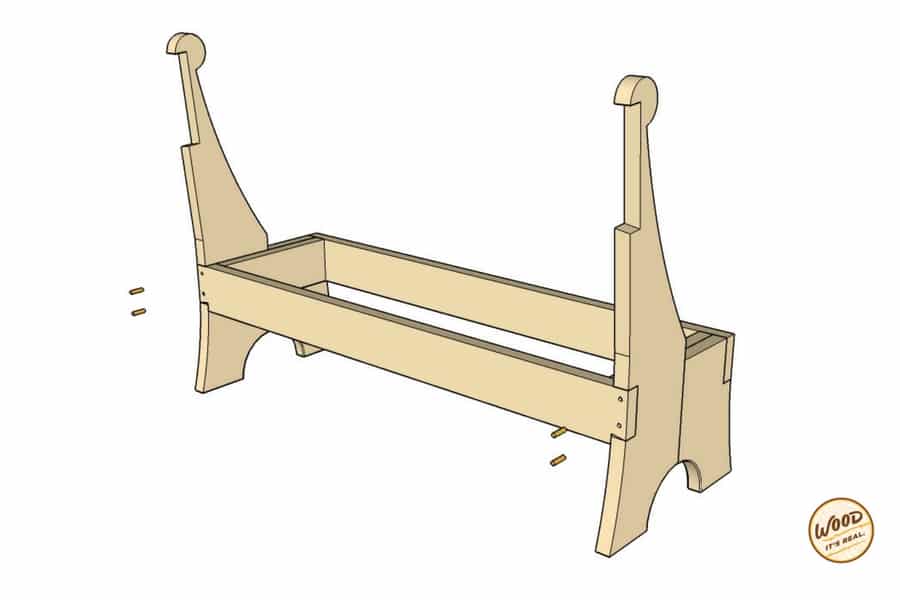
- Cut one 2×6 to a length of 60 inches long.
- We’ll make the dovetail pins on each end of the two-by-six aprons by measuring back from the edge an inch-and-a-half, the width of each side.
- Next, mark them and draw a line one inch long at that point.
- At the edge of the 2×6, measure up three-quarters of an inch, and connect that point with the one you just drew.
- Use an oscillating saw to cut the dovetails. The blade basically vibrates back and forth to make the cut and saves a lot of time.
- Once the pins are cut, trace the outlines on the front and rear edges of each side and make the cuts as deep as the back apron is thick.
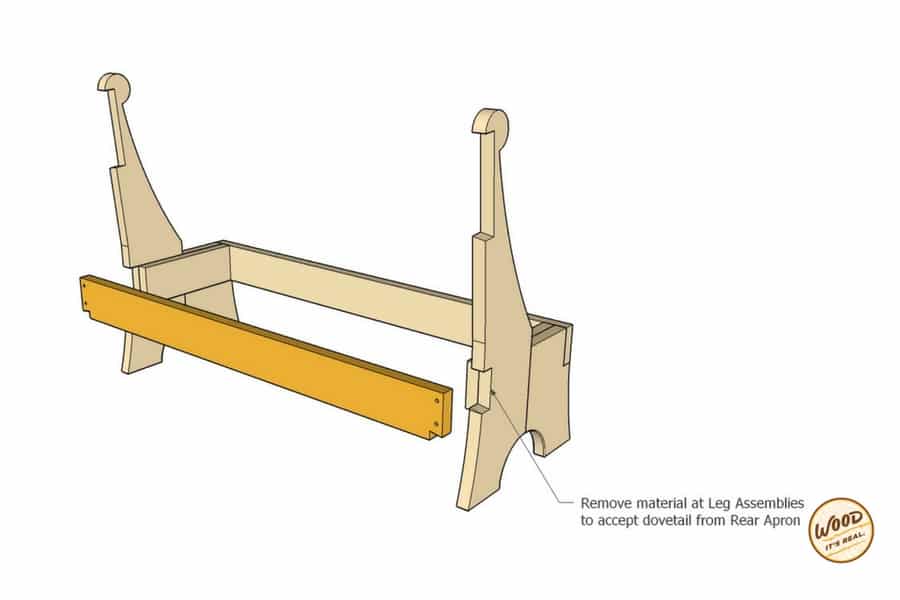
- Glue and clamp the back apron in place.
- Once dry, drill 3/8″ holes through each joint and into the sides.
- Then drive wooden dowels to secure the joints. Cut off any excess with a saw.
Step 6: Cut and Attach Center Brace
- Measure the distance between the front and back aprons.
- Cut a 2×6 board to that length.
- Attach with screws from the inside of the frame
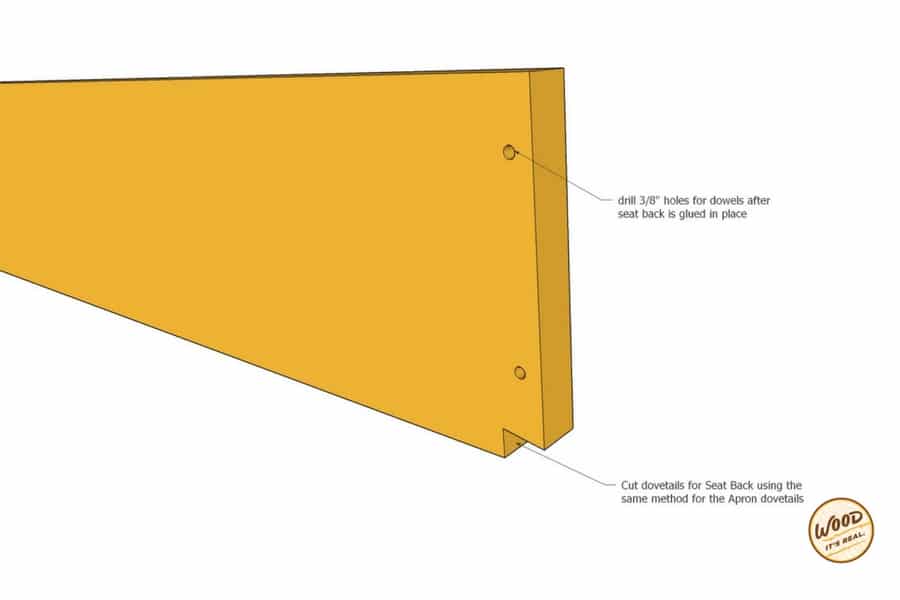
Step 7: Cut and Attach the Seat Back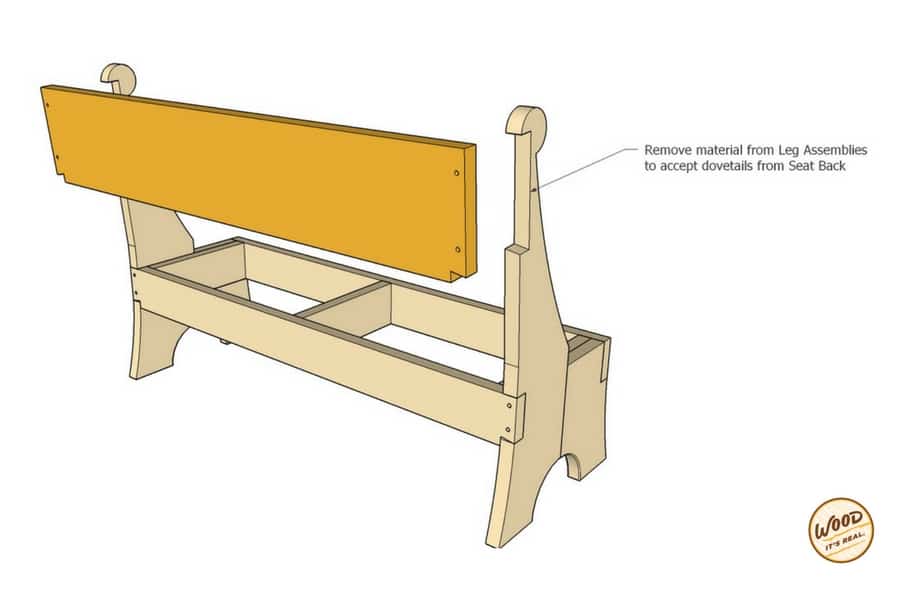
- Cut a 2×12 board to 60″
- Cut dovetails with the same technique as you did with the aprons into the bottom corners.
- Mark the back and use a saw to remove material to accept the dovetails for the seat back.
- Glue and clamp the back into place.
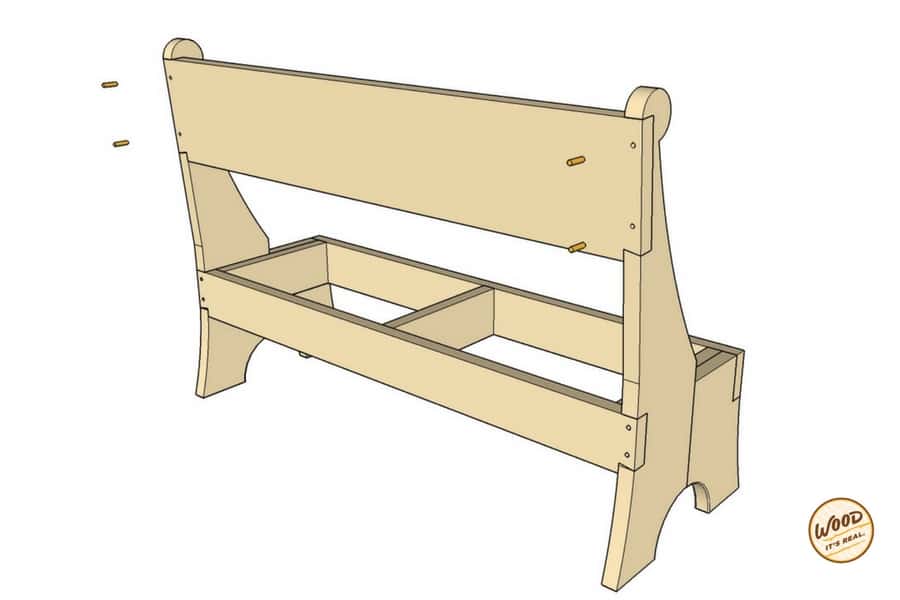
- Once dry, drill 3/8″ holes through each joint and into the sides.
- Then drive wooden dowels to secure the joints. Cut off any excess with a saw.
Step 8: Cut and Attach Seat Boards
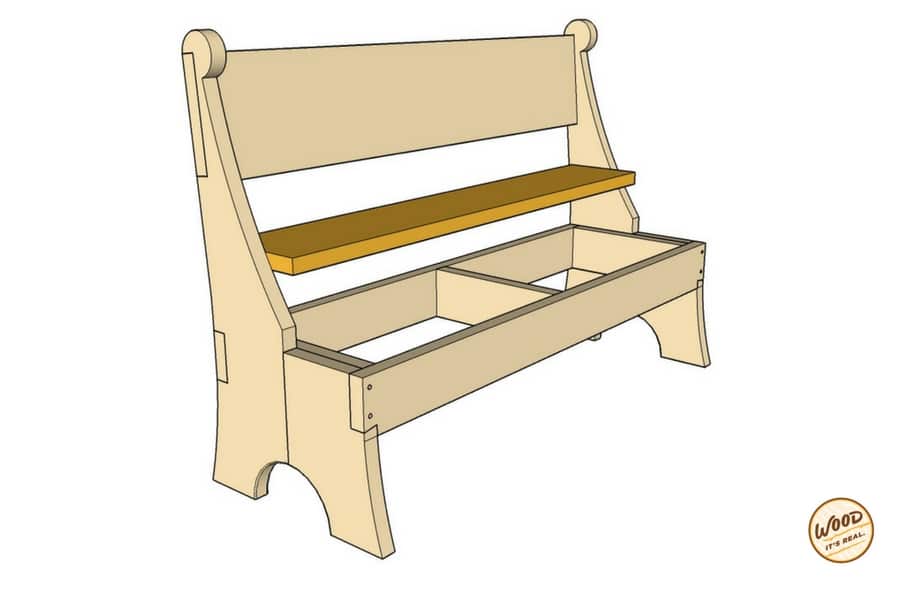
- Cut the rear board to 9.5″ wide. It will fit between the back ends and should be approximately 4’9″. Measure to make sure.
- Fasten with screws from the bottom so you don’t have visible screws from the top.
- Cut the front board, a 2×12, to 62″. It will hang over the sizes and front, so help give the bench more of a profile.
- Fasten with screws from the bottom of the bench so there are no visible screws from the top.
Step 9: Sand and Finish Off
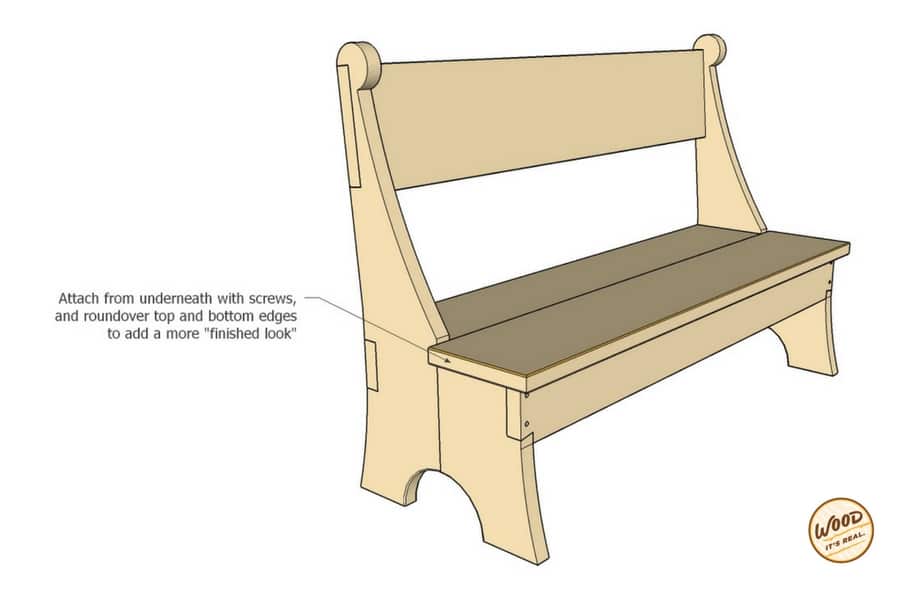
- Use a roundover bit to soften the leading edges of the seat.
- Give the entire bench a good sanding to get rid of any rough spots or sharp edges.
Step 10: Put your Feet Up and Enjoy Your Hard Work
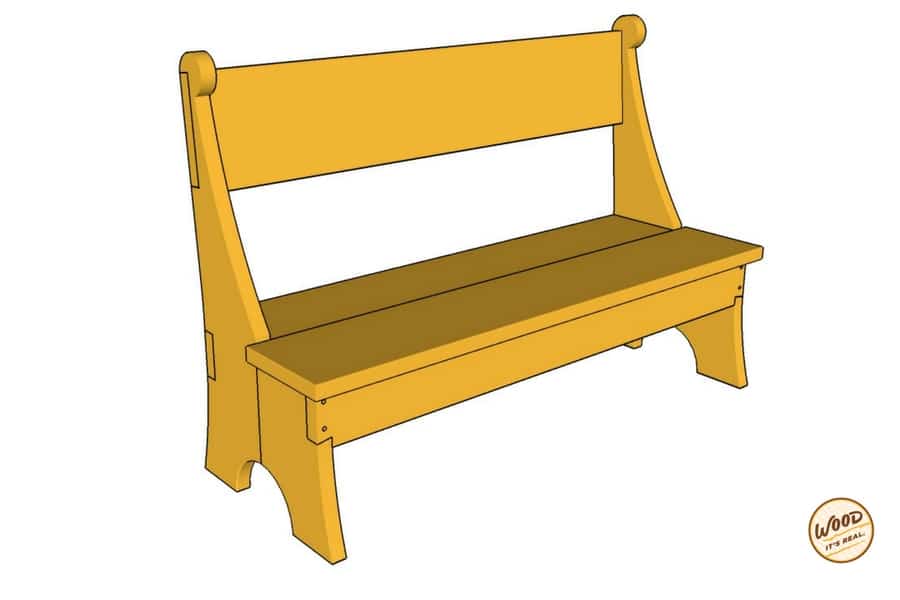
- Grab a book and find a few spare minutes in your busy day to relax and enjoy your own personal retreat.
How did it go? We love pictures and questions, please send both our way.